Program(ming) chairing the Show (i3D 2021)
Last year I wrote quite an extensive post about how I handled the posters session and part of the streaming duty at i3D 2020. This year we kept the format very similar and we even had two people dedicated to streaming, processing videos and handling YouTube and Discord. That was me and Mauricio Vives. I handled the technical parts of Discord, emailed instructions to authors about speaker prep and did most of the calendar invites, and I did streaming during the entire conference. Video processing, post-stream processing and receiving videos from the authors was handled by Mauricio. I will make this blog post a little bit more technical than last year’s because I want to share some of the software solutions made for i3D 2021. The rest of the post covers OBS plugins and scripts, embedding paper information, and how I handled mailing the conference participants.
OBS streaming
OBS proved itself as a good tool for our budget last year (free) and we continued using it this year. We evaluated other solutions, such as StreamYard, but they did not quite have the features that we needed at the time when we started conference planning. What I particularly like about OBS is that you can pre-build the entire show by creating dedicated scenes for each event and its architecture is very extensible, so you can do virtually anything, if what comes stock in OBS is not enough.
We had a scene collection for each day of the conference that I pre-built before the conference. It was very important to have a backup plan, if something happens with my setup. We did not reach a point during the conference when we needed to switch, but we were close, I had a power outage at one of the locations a few hours before the conference, so I quickly packed everything and relocated. Also, I had an Internet outage hours before the last day which thankfully did not cause any issues, but Mauricio was ready to take over. His setup always had the stream key for the respective day entered - ready to continue from where things broke. We duplicated my setup by keeping a copy on BitBucket with all the scripts and we used Google Drive for hosting videos. We actually started with just a Google Drive folder, but at one point I tripped the virus protection system in Google Drive a few times with my *.bat files and we got suddenly our video submission form flagged out of nowhere. So we decided that something fishy is going on and we moved all scripts to BitBucket. I was doing some version control in git already, so it was not a big trouble.
Other problems that I encountered required to make some specialized software solutions. I will break the discussion into a few sections dedicated to specific OBS problems that I needed to solve.
Map your own project drive
The most unavoidable problem of OBS is that it does not really have project files. It is possible to export and import scene collections, profiles and other elements as *.json files, except a few options that are stuck in the *.ini file, but it is still a lot of trouble to setup everything. Another issue is that it works only with absolute paths, which does not translate well between different machines. In the games industry and other parts of the entertainment industry, we have been solving the latter problem for decades for all kinds of software. I have worked already for two companies that exploited that kind of setup. Basically, you just need a project drive where you store all your data and all paths point to it, but that drive does not need to be physical. Microsoft OSes have been supporting drive substitution already for a few decades. So the first thing that I did was to add setup script that maps a project drive. I will provide a snippet for anyone that needs this kind of setup below:
start /wait reg query "HKEY_CURRENT_USER\Software\Microsoft\Windows\CurrentVersion\Run" /v "Project Drive"
if %errorlevel%==1 (
	echo Adding registry key
	reg add "HKEY_CURRENT_USER\Software\Microsoft\Windows\CurrentVersion\Run" /v "Project Drive" /t REG_SZ /d "subst I: \"%~dp0\""
)

if not exist I: (
    subst I: "%~dp0"
)
Basically, in the latest version of Windows 10, commands executed at startup are stored in HKEY_CURRENT_USER\Software\Microsoft\Windows\CurrentVersion\Run. We store our subst command in this registry key, and, if needed, we substitute our drive. You can use multiple letters in different registry keys, if you work on different projects, just throw those lines in your setup.bat, place that file at the root of your project, and when it gets executed, voila, you have your project drive. Afterwards, make sure that you always point to files on your project drive, instead of the physical folder and inspect your scene collection *.json files. After you are done with the show, you might want to clean up, so here is how to reverse those changes in your cleanup.bat:
if exist I: (
	call subst /d I:
)
start /wait reg delete "HKEY_CURRENT_USER\Software\Microsoft\Windows\CurrentVersion\Run" /v "Project Drive" /F
Now that you have a project drive, how do you keep your OBS files in sync? Our solution was to store all *.json files and profiles in a common folder in I:\obs. That way it was possible to copy everything in the right folders. OBS stores its scenes in %APPDATA%\obs-studio\basic\scenes\ and profiles are stored in %APPDATA%\obs-studio\basic\profiles. So we used something along those lines in our setup.bat:
echo Copying OBS scene file...
start /wait xcopy /y "%~dp0\obs\*.json" "%APPDATA%\obs-studio\basic\scenes\"
if %errorlevel%==1 (
	echo ERROR: failed to copy scene OBS file
	exit /b 1
)

set PROFILE_DIR="%APPDATA%\obs-studio\basic\profiles\My_Profile"
if not exist "%PROFILE_DIR%" (
	mkdir "%APPDATA%\obs-studio\basic\profiles\My_Profile"
	start /wait xcopy /y "%~dp0\obs\My_Profile" "%PROFILE_DIR%\"
	if %errorlevel%==1 (
		echo ERROR: failed to copy scene OBS file
		exit /b 1
	)
)
But you will need some way to copy them back after you edit them in OBS. So we had another script that did this job:
@echo off

echo Copying back OBS scenes

start /wait xcopy /y %APPDATA%\obs-studio\basic\scenes\*.json "%~dp0\obs\"
if %errorlevel%==1 (
	echo ERROR: failed to copy OBS scene file
	exit /b 1
)

echo Copying back OBS profiles

start /wait xcopy /y %APPDATA%\obs-studio\basic\profiles\My_Profile "%~dp0\obs\My_Profile"
if %errorlevel%==1 (
	echo ERROR: failed to copy OBS profile file
	exit /b 1
)

echo All set
pause
endlocal
That is pretty much enough to handle replicating content between systems. We used Git for version control, but you can use your favorite version control system for that purpose. The good thing is that you can always re-run your setup.bat if you completely messed up the scenes and it will restore the last working copy. It is quite crucial because OBS does not have an undo/redo stack, so everything needs to be fixed manually otherwise. The only important element left is how to download the content because getting enough storage for them on BitBucket costs something. You can avoid that problem on Google Drive which takes space from each contributor’s Drive.
Asking Google Drive politely to give you access to a folder and downloading files
Google has quite complicated API with many security tokens and checks for accessing any of its web infrastructure. Google Drive is part of it and the great thing is that they provide a Python library which is available in pip and works out of the box. First, you need to authenticate your app. Google provides this part in their tutorial, but it does not hurt to repeat it here for completeness:
from __future__ import print_function
import os.path
import io
from googleapiclient.discovery import build
from google_auth_oauthlib.flow import InstalledAppFlow
from google.auth.transport.requests import Request
from google.oauth2.credentials import Credentials
from googleapiclient.http import MediaIoBaseDownload

cwd = os.path.dirname(os.path.realpath(__file__))

SCOPES = ['https://www.googleapis.com/auth/drive.readonly']

creds = None
if os.path.exists('%s/security-token.json' % cwd):
    creds = Credentials.from_authorized_user_file('%s/security-token.json' % cwd, SCOPES)

if not creds or not creds.valid:
    if creds and creds.expired and creds.refresh_token:
        creds.refresh(Request())
    else:
        flow = InstalledAppFlow.from_client_secrets_file('%s/security-credentials.json' % cwd, SCOPES)
        creds = flow.run_local_server(port=0)
    # Save the credentials for the next run
    with open('token.json', 'w') as token:
        token.write(creds.to_json())

drive_service = build('drive', 'v3', credentials=creds)
What you might notice in this code is that you need to first get a security token. Google really wants you to register your application before you start using their APIs. They have an explanation here how to register your credentials. You also need to enable the drive API. The API might surprise you also with a few more links that you need to follow before it starts allowing you to do anything else. Now the important part is how do you download anything? It is not that well documented and requires some digging. What is important is to download somehow directories recursively. Here is the function that is used for that purpose:
def download_folder(folder_id, output_folder, recursive=False):
    page_token = None
    continue_iteration = True
    # download folders recursively
    if recursive:
        while continue_iteration:
            response = drive_service.files().list(q = "mimeType='application/vnd.google-apps.folder' and '" + folder_id + "' in parents", pageSize=100, fields="nextPageToken, files(id, name)", pageToken=page_token).execute()
            folders = response.get('files', [])
            for folder in folders:
                filename = folder.get('name')
                cur_output_dir = output_folder + os.path.sep + filename
                if not os.path.exists(cur_output_dir):
                    os.mkdir(cur_output_dir)
                cur_folder_id = folder.get('id')
                download_folder(cur_folder_id, cur_output_dir, recursive)
            page_token = response.get('nextPageToken', None)
            continue_iteration = page_token is not None

    # download files in current folder
    while continue_iteration:
        response = drive_service.files().list(q = "mimeType!='application/vnd.google-apps.folder' and '" + folder_id + "' in parents", pageSize=100, fields="nextPageToken, files(id, name)", pageToken=page_token).execute()
        items = response.get('files', [])

        for item in items:
            file_id = item.get('id')
            filename = item.get('name')
            request = drive_service.files().get_media(fileId=file_id)
            fh = io.FileIO('%s/%s' % (output_folder, filename), mode='wb+')
            downloader = MediaIoBaseDownload(fh, request)
            done = False
            while done is False:
                status, done = downloader.next_chunk()
                print("Downloading %s %d%%." % (filename, int(status.progress() * 100)))
        page_token = response.get('nextPageToken', None)
        continue_iteration = page_token is not None
The trick is to split folders and files by mime type and then you can recursively call the function for each subfolder. One peculiarity of these loops is that you need to look for a nextPageToken, because the API is web based and serves content on separate pages, otherwise, if you ignore it, you will miss downloading some of the content. Downloading is done through MediaIoBaseDownload which is part of googleapiclient.http. Suppose that you have a folder in Google Drive https://drive.google.com/drive/folders/16Xlh_-l9XXXXXXXXXXXXXXXXXXXXXXX. The hash at the end identifies your folder. You can download it with the function above as follows:
content_dir = '%s/videos/content' % cwd
if not os.path.exists(content_dir):
    os.mkdir(content_dir)

download_folder('16Xlh_-l9XXXXXXXXXXXXXXXXXXXXXXX', content_dir, recursive=True)
We had a few function calls to download all folders. The great thing is that you can continue working on videos and everyone else can replicate the changes. We had a few last minute changes to fix certain aspects of videos, so it was a very useful capability.
One issue with Python scripts is that people need to install a Python interpreter and that can be quite involved. That is why I started to bundle miniconda with our setup. More details in the next section.
Installing minimal Python
Miniconda provides a bunch of executables on their website. Any 3.X version will do. Suppose that you call your file I:\software_archives\Miniconda3-latest-Windows-x86_64.exe, you can install directly from the archive (probably in your setup.bat):
set CONDA_DIR=%~dp0\software\miniconda
if not exist "%CONDA_DIR%" (
	start /wait "" "%~dp0\software_archives\Miniconda3-latest-Windows-x86_64.exe" /InstallationType=JustMe /RegisterPython=0 /S /D=%CONDA_DIR%\
)
You will need a virtual environment, if you plan to reuse it also for scripting in OBS. To create one you can do it through the same script:
call "%CONDA_DIR%\Scripts\activate"

SET ENV_EXISTS=0
FOR /F %%i IN ('conda info --envs') DO (
	if %%i==py36 (
		SET ENV_EXISTS=1
	)

)

IF %ENV_EXISTS%==1 (
	ECHO environment already exists
) ELSE (
	call conda create -n py36 python=3.6 --yes
)

call activate py36
echo Installing dependencies, if necessary
call python -m pip install -r "%~dp0\requirements.txt"
call conda deactivate
call conda deactivate
Now you need some dependencies to install, so that your scripts works. We used the following requirements.txt in the same folder:
aiohttp==3.7.4
async-timeout==3.0.1
attrs==20.3.0
cachetools==4.2.1
certifi==2020.12.5
chardet==3.0.4
configparser==5.0.2
discord==1.0.1
discord.py==1.6.0
google-api-core==1.26.3
google-api-python-client==2.1.0
google-auth==1.28.1
google-auth-httplib2==0.1.0
google-auth-oauthlib==0.4.4
googleapis-common-protos==1.53.0
httplib2==0.19.1
idna==2.10
idna-ssl==1.1.0
multidict==5.1.0
oauthlib==3.1.0
packaging==20.9
protobuf==3.15.8
pyasn1==0.4.8
pyasn1-modules==0.2.8
pyparsing==2.4.7
pytz==2021.1
requests==2.25.1
requests-oauthlib==1.3.0
rsa==4.7.2
six==1.15.0
typing-extensions==3.7.4.3
uritemplate==3.0.1
urllib3==1.26.4
wincertstore==0.2
yarl==1.6.3
However, it is really easy to make your own script to freeze dependencies whenever you install new packages in your virtual environment:
@echo off

set CONDA_DIR=%~dp0\software\miniconda
call "%CONDA_DIR%\Scripts\activate" py36
python -m pip freeze > requirements.txt
call conda deactivate
Now you have your own python installation, so to call the download script above, we can call it download-content.py and executing it happens as follows:
set CONDA_DIR=%~dp0\software\miniconda
call "%CONDA_DIR%\Scripts\activate" py36
call python "%~dp0\download-content.py"
call conda deactivate
We used the same approach for a few other scripts. You can go a step further and keep also a copy of OBS. They provide archives on their website which you can unzip manually, but it is relatively trivial to do in powershell:
powershell.exe -command "Expand-Archive -Force '%OBS_ARCHIVE%' '%OBS_DIR%'"Having the basics solved is good. However, I want to outline some of the other issues that I tried to fix with automation and other tricks. What I wanted to fix is templates for the discussion scenes, make fancier transitions, highlight the current speakers' name and affiliation, have better music for the breaks and automate announcements on Discord.
Improving templates
What I did not like in particular is having the Zoom background. If I recall correctly, it used to be a gradient, but now it is a solid color. Not only that, it is almost impossible to set your virtual background to the same background, so it is really easy for Color Keying in OBS. I considered at one point to mess around with the Zoom API, but it requires that the top-level account administrator gives you developer rights and my guess is that ACM will not be particularly happy about me hacking around Zoom for slightly fancier visualization.
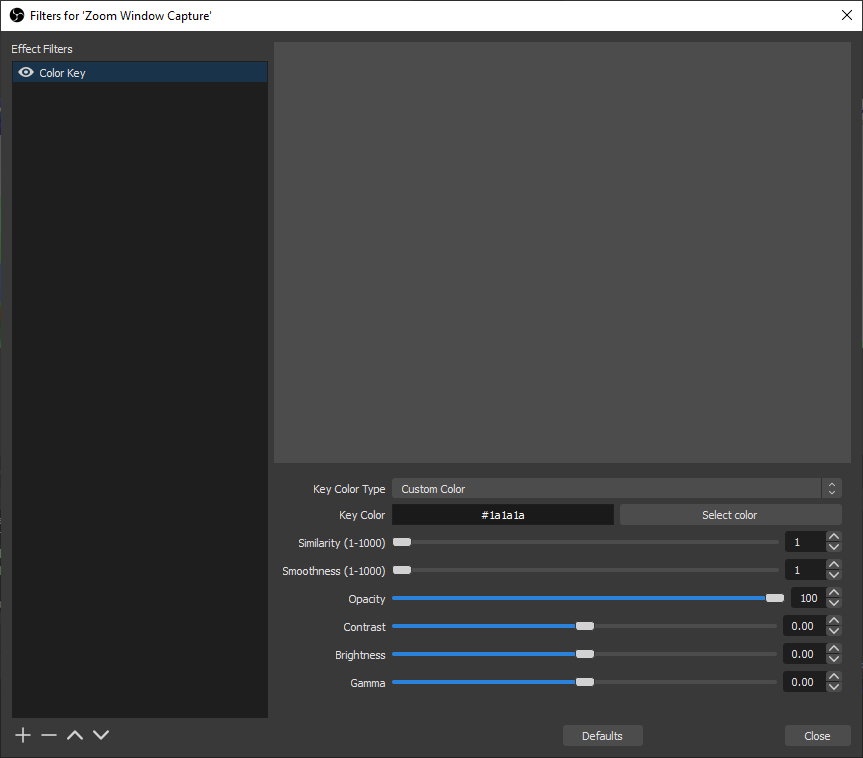
Note, how Similarity and Smoothness are set to 1. The closest virtual background that you can set with value around #1a1a1a requires similarity 5 to erase the background, so I did not ever see pixels becoming transparent on speaker cameras. It seems to be something about Zoom color correction. Also, it works only with Window Capture because Desktop Capture in OBS seems to also shift colors. The final look that we achieved can be seen in the archived videos from the conference, but here is a snippet:
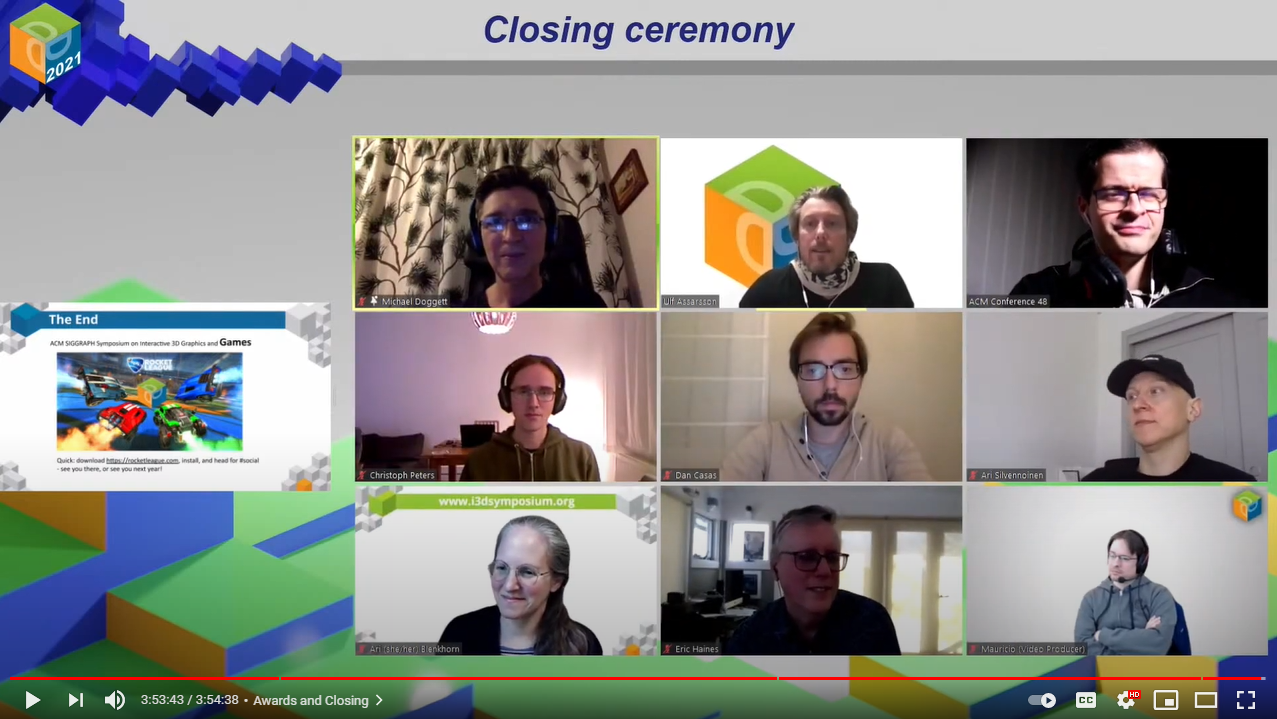
We again relied on the side-by-side view and switched between gallery and speaker view depending on whether we needed to spotlight someone. Zoom allows to spotlight multiple people which is really handy for some of the discussions and during presentation when we need to spotlight the current speaker. Of course, I disabled video for people whose camera was switched off.
All templates were drawn in Blender and text was directly added in OBS, so it was really easy to modify and create all possible scenes. References in OBS also helped a lot with redundant elements.
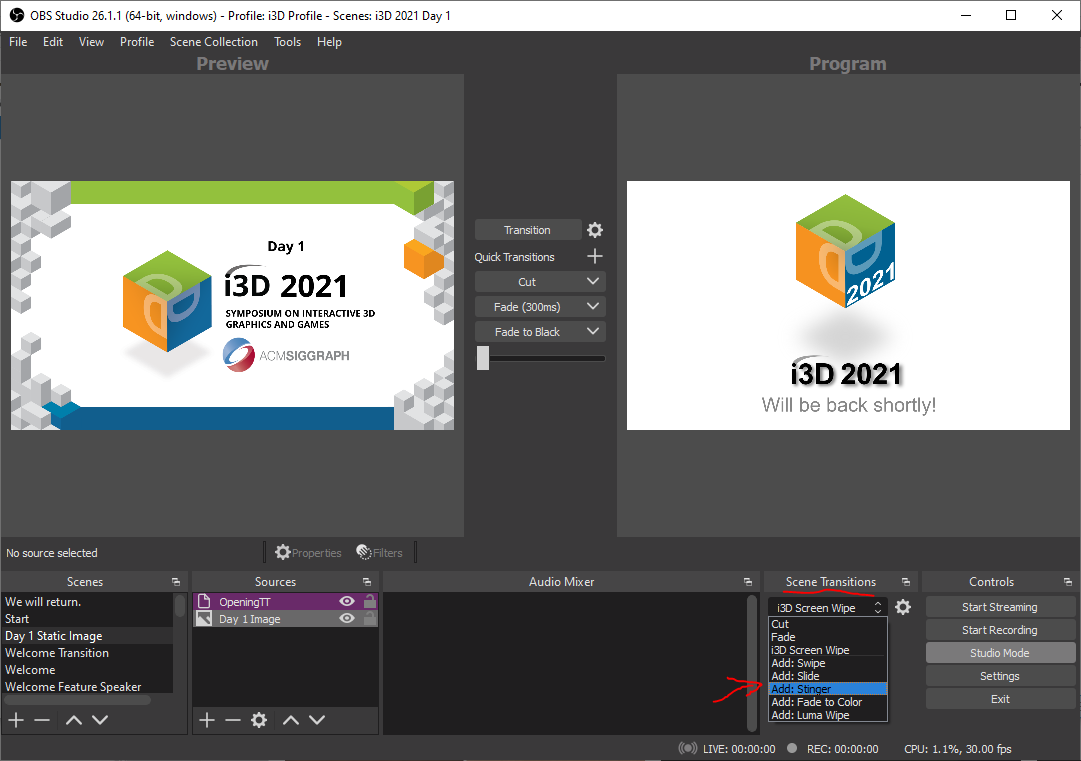
Fancy transitions
Most professionally made shows have very fancy transitions, so I investigated how to do it in OBS. Turns out that they are supported out of the box. They are called “Stinger” and you can add them in Scene Transitions.
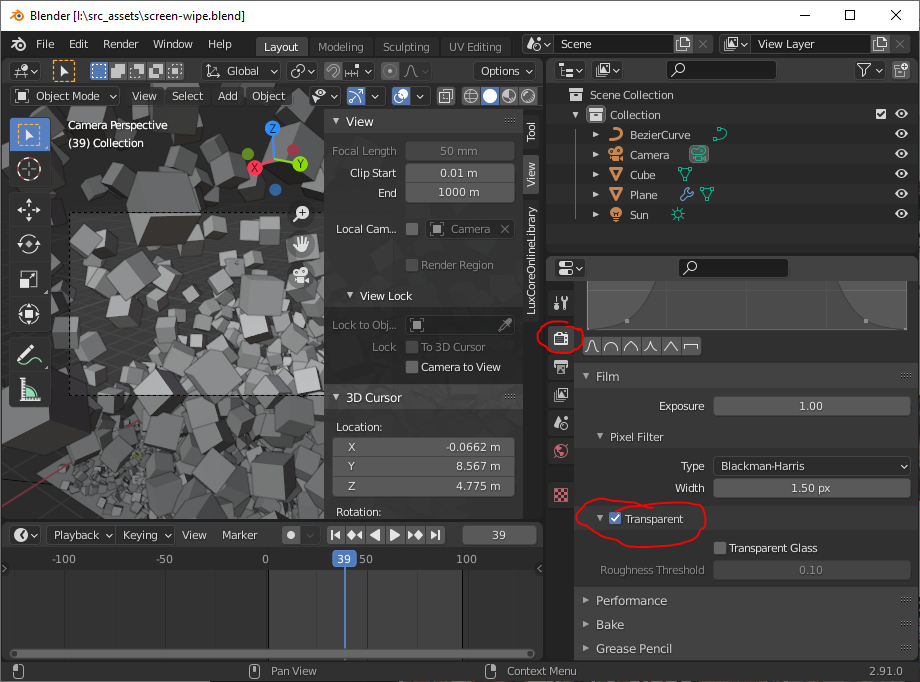
You will need a video that has alpha channel. I rendered all my images in Blender for that particular transition. You need to make the Film in your Blender renderer to be transparent to get images with alpha channel. I used Cycles which also supports alpha for motion blur and depth of field which made the actual effect even more compelling.
I used FFMpeg to create videos encoded with VP9 and stored them in *.webm containers which support alpha transparency. Here is the exact command that I used to create that transition:
ffmpeg.exe -y -start_number 1 -i .\%%04d.png -c:v libvpx-vp9 -pix_fmt
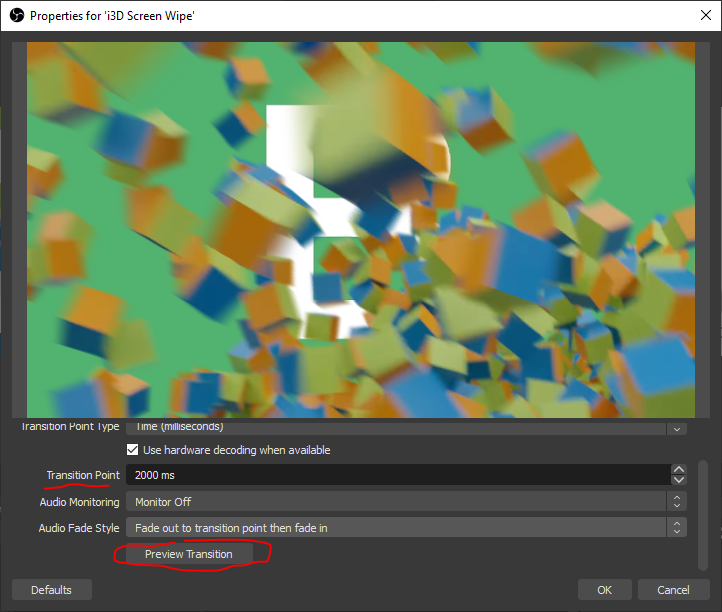
yuva420p i3d-wipe.webmFor the flying cubes, I used a particle system and set particle objects to be copies of a cube and I used a curve that particles need to follow. Pretty nifty and simple effect. When you add your transition to OBS, make sure to specify a good Transition Point in the properties of your transition and test it with the Preview Transition button at the bottom of the scrollable area in the dialog.
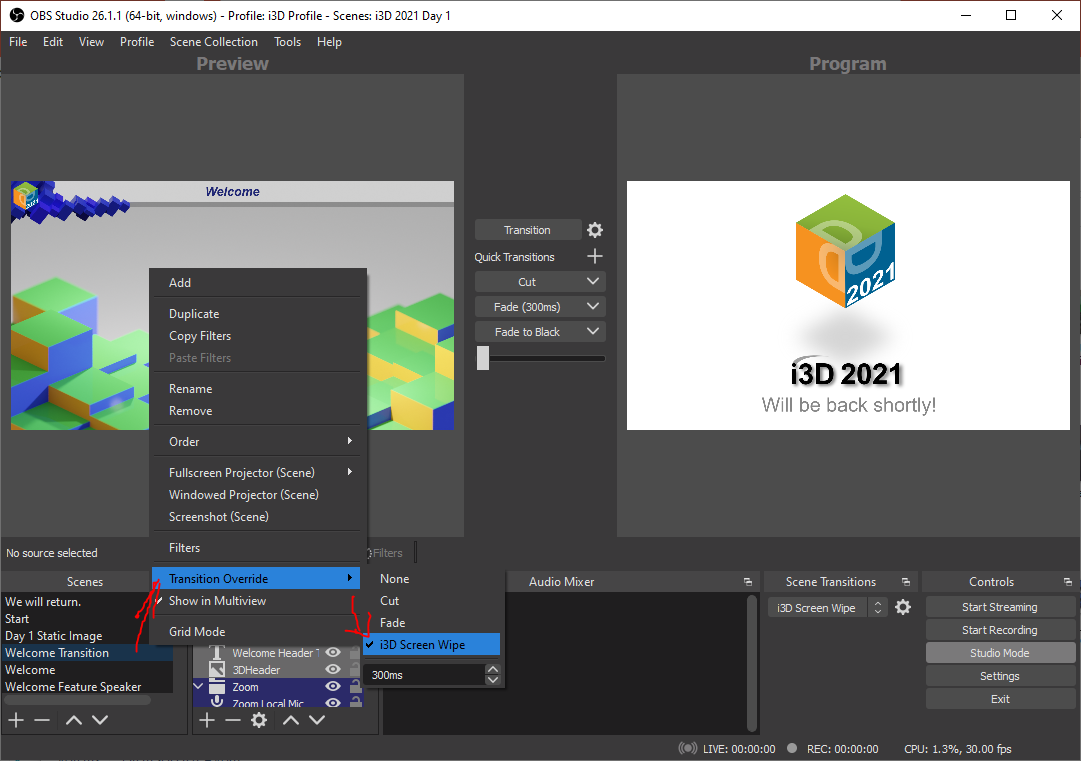
OBS allows you to override transitions, so that it plays a pre-determined transition when you click transition for a particular scene. I set up scenes, so that our “We will be back shortly!” (technical difficulties) slide and slides within the same session use cuts, our slides that transition from a Break to a session use Fade, but the first scene when we start the discussion or switch to playing videos use the fancy transition. Clicking Transition was the default way of switching scenes, however, sometimes cutting was required when re-adjusting parameters that require a transition in Studio Mode.
Featuring a speaker during the show
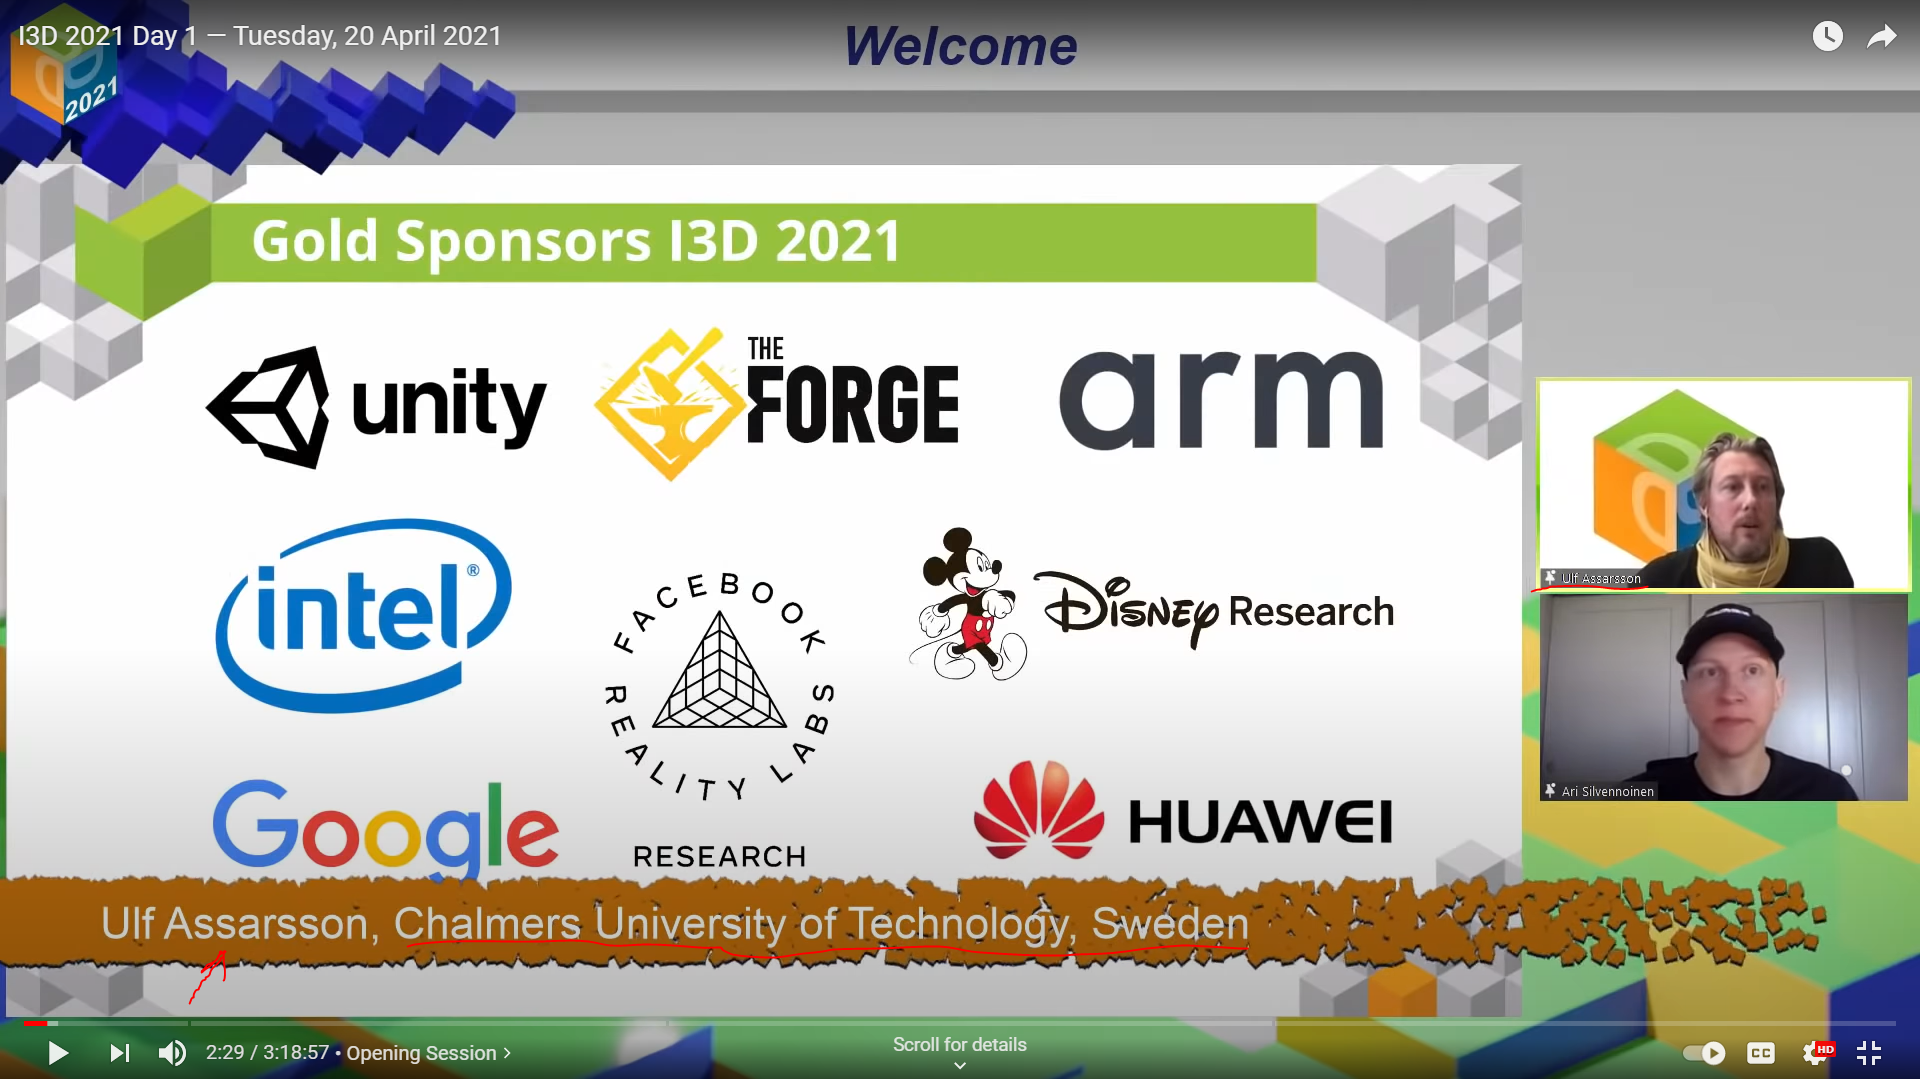
Zoom already has some functionality for overlaying names on top of each user’s video feed. However, generally these labels are relatively small and do not convey the entire information. I did not quite like that fact at last year’s i3D, so I decided to fix it. A sample of the final caption is shown below.
What I needed was a good way to enter all possible speakers during the conference and dynamically pop captions. Also, I wanted to add some movement to capture the viewer’s attention. The latter effect I achieved with a video using particle system in DaVinci Resolve. However, OBS does not really support combining videos with caption out of the box that can enable something that complicated, so I was forced to make my own plugin. Scripting that feature was not an option, since it requires to access OBS internals for rendering purposes which are not fully exposed neither in Lua, nor Python. Fortunately, OBS comes with a fully working FFmpeg and text source. My plugin basically fused both of them to enable popping text after certain time has passed and show the name and affiliation of the speaker. Time is directly extracted from the video playback, so it was pretty reliable at playing at the right time. However, I had to re-implement certain functions that happen to be static in the original implementation of the FFmpeg source. The most important being drawing to screen. OBS in its current version kept the async_texrender backbuffer as internal variable of the source which forced me to link against the internals of OBS and access it directly. My guess is that it will not work in future versions, but it was good enough for my application. The major issue was that OBS does not clear automatically the backbuffer and it can stay filled with old content, if it suddenly stops rendering. I noticed it happening a few times and I did a hotfix after the second day of the conference and that problem did not appear in the last day. Everything else worked pretty reliably. The properties window is shown below:
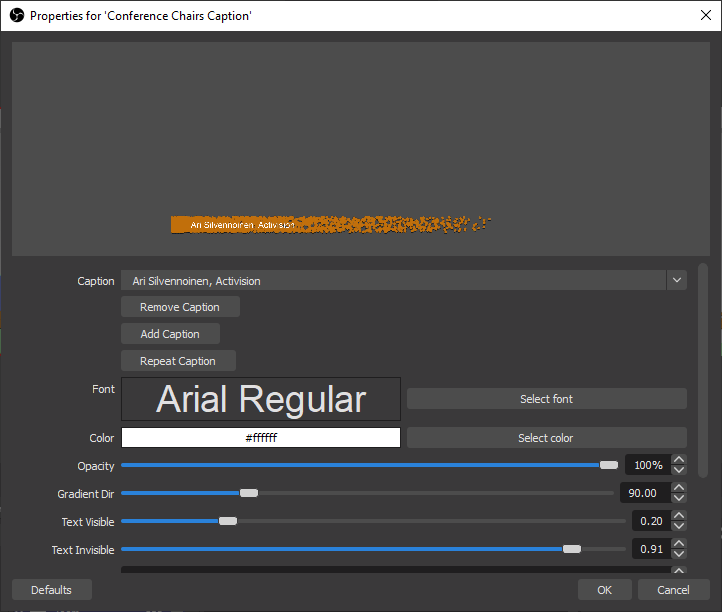
Each session had its own source and I entered all possible speakers in the “Caption” drop-down and edited the list with the “Add Caption” and “Remove Caption” buttons. This allowed me to very quickly do adjustments, even during the show. Also, I had the handy “Repeat Caption” button that I used to select the current speaker from the drop-down and quickly pop caption on screen. It is really quick way to show caption during a very fast back and forth.
Better music
We picked stock music from Storyblocks. For the price of a slightly more expensive burger, you can get access to a very nice library of Royalty-free music and they also offer the option to register your channel, so that they can clean any Copyright Claims within 30 minutes after uploading content. Mauricio recommended that service and it actually delivered, so I am pretty happy about how it turned out.
I used the same caption mechanism as the one that I crafted for speakers to show what is the current song playing. However, I did not build a complete music player. Instead I decided to rely on the existing “VLC Source” in OBS. I setup a handler for the “media_started” event and added a flag which triggers a 5 second counter. The main reason for waiting is that the libvlc integration does not return the correct metadata immediately after the media starts playing, so you need to wait. Afterwards, I used proc_handler_call to call the “get_metadata” function in the VLC source. Since that is slightly more tricky and poorly document, here is a snippet from my code:
static void caption_source_popup(struct caption_source *context)
{
	proc_handler_t *ph = obs_source_get_proc_handler(context->mon_source);

	calldata_t cd_title = {}, cd_artist = {};

    // Get song title string
	calldata_set_string(&cd_title, "tag_id", "title");
	proc_handler_call(ph, "get_metadata", &cd_title);
	const char *title_str = nullptr;
	calldata_get_string(&cd_title, "tag_data", &title_str);
	if (!title_str)
		title_str = "";

    // Get artist string
	calldata_set_string(&cd_artist, "tag_id", "artist");
	proc_handler_call(ph, "get_metadata", &cd_artist);
	const char *artist_str = nullptr;
	calldata_get_string(&cd_artist, "tag_data", &artist_str);
	if (!artist_str)
		artist_str = "";

    // Assemble caption text
	size_t len = strlen(title_str) + strlen(artist_str) + 11;
	char *temp_str = reinterpret_cast<char *>(bmalloc(len));
	sprintf_s(temp_str, len, "Music: %s - %s", title_str, artist_str);

	bfree(context->text);

    // Store by converting to wchar
	context->text = convert_to_wchar_newline(temp_str);
	bfree(temp_str);

    // Trigger rendering
	caption_render_text(context);
	obs_source_media_restart(context->source);

	calldata_free(&cd_artist);
	calldata_free(&cd_title);
}
Storyblocks did not provide metadata for all songs on their service, so I had to add some of it by hand. Fortunately, it was relatively easy. In VLC, you can open Tools->Media Information or press Ctrl+I and update it by hand. Then you can click “Save Metadata” and next time when you start the player, you will see the correct metadata. Not only that, it is saved in the actual file, so any player will display the correct metadata.
Here is a snippet of how it looked in the end:
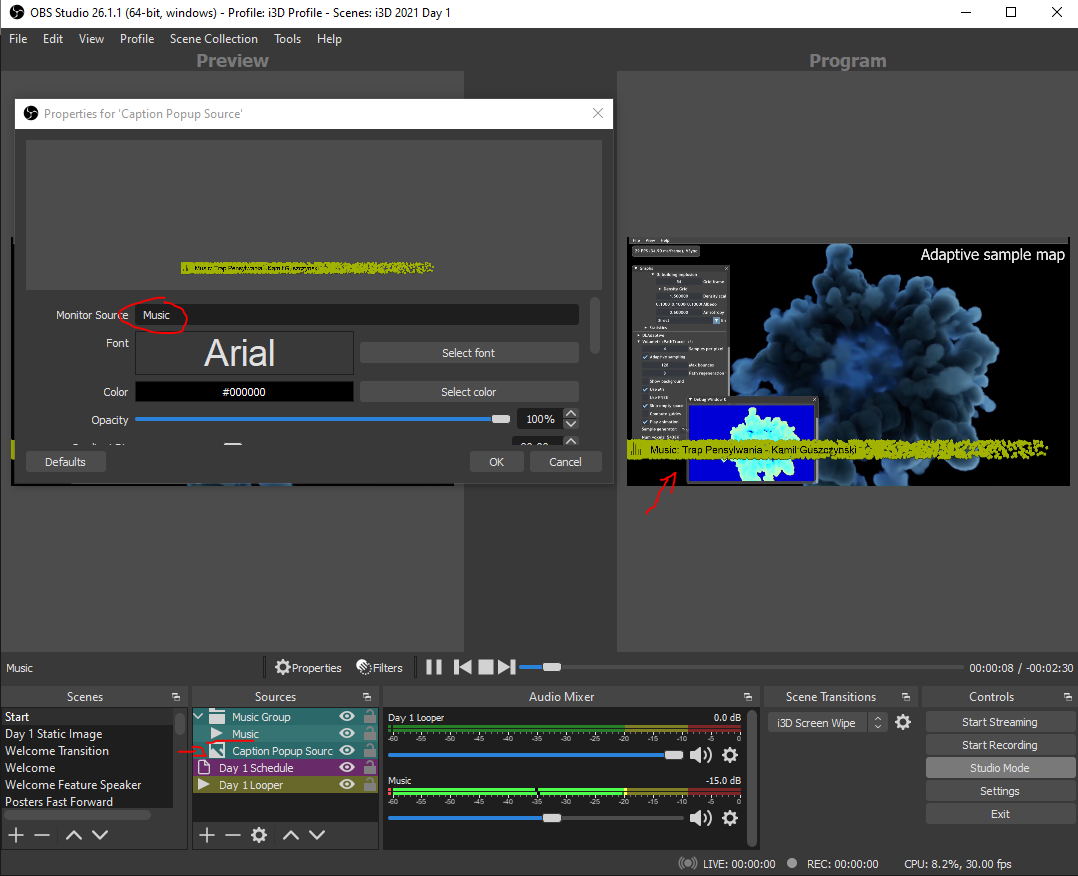
Basically, the Caption Popup Source monitored the source called Music and popped up caption at the right moment.
Patching OBS to use our miniconda copy
Before talking about our Discord bot, it will be nice to mention the extra work that I did to patch the OBS config to use our miniconda copy. OBS stores its path to Python in %APPDATA%\obs-studio\global.ini . OBS currently supports only Python 3.6, so our handy miniconda environment py36 will come into play here. If we start the script below directly from that environment as I explained above for the download script, we can patch the *.ini file with the correct path:
import configparser
from subprocess import Popen,PIPE
import sys, os
import codecs

print(sys.executable)

conda_python = os.path.dirname(sys.executable).replace("\\", "/")
print("Found counda and generated the following virtual environment path: " + conda_python)

ini_path = os.path.expandvars("%APPDATA%\\obs-studio\\global.ini")

print("INFO: Patching OBS global.ini")
config = configparser.RawConfigParser()
config.readfp(codecs.open(ini_path, "r", "utf-8-sig"))
config['Python'] = { 'Path64bit' : conda_python }
with open(ini_path, 'w') as cfgfile:
    config.write(cfgfile, space_around_delimiters=False)
print("INFO: OBS global.init patching is done")
Discord announcements and show status reporting
I was occupied with monitoring the show, popping up captions and spotlighting people, so having automation for writing announcements was really nice. I had some pre-canned messages for the beginning of each session that I inserted in each scene. I had a very simple source in Lua that enabled me to write those message:
obs = obslua
bit = require("bit")

message_source_def = {}
message_source_def.id = "lua_discord_message_source"
message_source_def.output_flags = bit.bor(obs.OBS_SOURCE_CUSTOM_DRAW)

message_source_def.get_name = function()
	return "Discord Message"
end

message_source_def.create = function(source, settings)
	local data = {}
	return data
end

message_source_def.get_properties = function()
    props = obs.obs_properties_create()
    obs.obs_properties_add_text(props, "text", "Message", obs.OBS_TEXT_MULTILINE)
    obs.obs_properties_add_text(props, "channel", "Channel", obs.OBS_TEXT_DEFAULT)
    return props
end

message_source_def.get_defaults = function(settings)
    if obs.obs_data_get_string(settings, "channel") == "" then
        obs.obs_data_set_string(settings, "channel", "announcements")
    end
end

message_source_def.destroy = function(data)
end

obs.obs_register_source(message_source_def)
Each message is targeted for a particular channel. You can see below how the dialog looked:
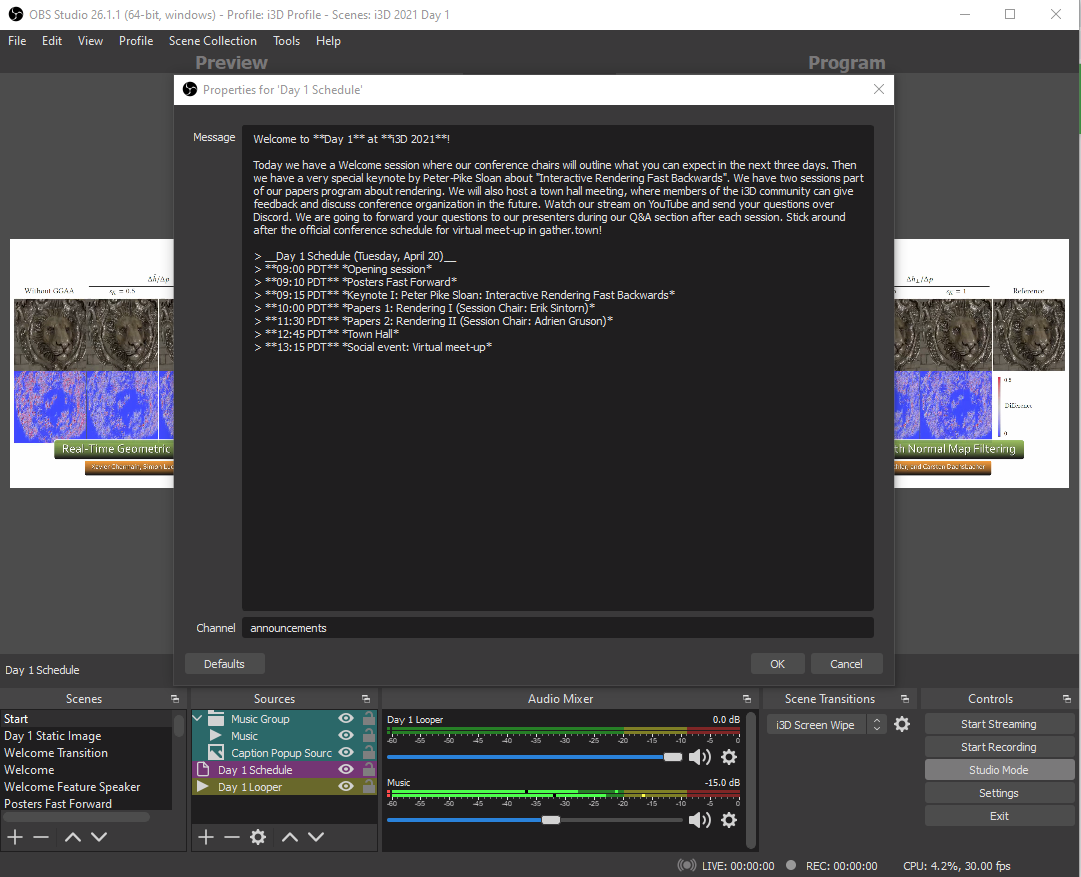
As you can see, I also used the chat formatting support in Discord which made the messages look really nice.
Another feature that I incorporated was time tracking. It was really helpful to get time converted for me on the fly and get notifications about remaining time and share them with the rest of the committee on Discord. Also, we got a pretty good record of how well we followed the schedule. Again, I had a custom source for that functionality:
function script_description()
	return "* Adds a \"Discord Message\" source which is used by discord integration to send messages.\n* Adds a \"Discord Time Tracking\" source which is used to time tracking purposes.\n"
end

time_tracking_source_def = {}
time_tracking_source_def.id = "lua_discord_time_tracking_source"
time_tracking_source_def.output_flags = bit.bor(obs.OBS_SOURCE_CUSTOM_DRAW)

time_tracking_source_def.get_name = function()
	return "Discord Time Tracking"
end

time_tracking_source_def.create = function(source, settings)
	local data = {}
	return data
end

time_tracking_source_def.get_properties = function()
    props = obs.obs_properties_create()
    obs.obs_properties_add_text(props, "name", "Name", obs.OBS_TEXT_DEFAULT)
    obs.obs_properties_add_int(props, "start_time", "Start Time (HHMM)", 0, 2400, 1)
    obs.obs_properties_add_int(props, "end_time", "End Time (HHMM)", 0, 2400, 1)
    return props
end

time_tracking_source_def.get_defaults = function(settings)
    obs.obs_data_set_default_int(settings, "start_time", 900)
    obs.obs_data_set_default_int(settings, "end_time", 1000)
end

time_tracking_source_def.destroy = function(data)
end

obs.obs_register_source(time_tracking_source_def)
I did not find a way to specify time in OBS properties, so I used some military time from 0-2400 hours.
![]()
The actual bot was written using discord.py. Developing scripts for OBS is a bit of good old printf debugging. I started my script directly with a print because it often failed to load modules and I want to at least make sure that it loads the script:
|
|
OBS by default is single-threaded, so asyncio is used to provide parallelism and avoid everything getting stuck. More tricks will follow later to make it work. I am using pytz for time zone conversion and the integrated datetime module because the bot does time tracking. Discord.py handles most of the connectivity, however, it does not automatically replace channel names with links, so I was forced to use regex to replace them manually.
Time tracking is accomplished with a very simple finite state machine.
|
|
Generally, the bot stays in the INITIAL state. When it encounters a Time Tracking source in a just activated scene, it does a check against the event start and end time, and then determines what is the current state: START_IN_ADVANCE, if the event started earlier than expected; STARTED, if it started after its expected start time; WARNING_5_MINUTES to warn about 5 minutes still remaining during this event; and ENDED when the event goes overtime. The bot works in the background, so the source provides just the current start and end time. It does its time tracking in a separate main loop.
I have added an option to activate and deactivate the bot, so that we can test the scenes without anyone knowing, but keep it activate during the show to benefit from the time tracking and automatic announcements. I allow only the deactivation message to pass when the bot becomes inactive:
|
|
Bots in discord.py are implemented by inheriting discord.Client. I keep the state of time tracking, current time tracked event, whether announcements are active (announcements_active), Pacific Time Zone is hardcoded in the variable pacific, and I have a variable started that I use to avoid some failures when OBS shutdowns and starts removing sources. OBS spuriously activates sources when deleting scenes and it is possible to corrupt the state, if you start executing code from a script.
|
|
Discord.py notifies you when the bot successfully logins:
|
|
Sending a message is relatively straightforward, you need to schedule a task that sends the messages (self.loop.create_task(chan.send(text))). However, what I wanted to enable is proper replacement of mentions. Also, check that the message is unique, so that the bot does not repeat itself, if I end up at the same scene twice. And, of course, I wanted to be sure that it is not sending messages when it is inactive. The code for sending a message is listed below:
|
|
This code is activated when a message source is detected in the current scene as shown below:
|
|
Time tracking is not really activated, it is just started by assigning the right variables, which include start_time, end_time, event name.
|
|
Dispatch is done based on source id:
|
|
The important part of the main loop is to stop the loop (self.loop.stop()) and run it forever (self.loop.run_forever()). I did not find any better way of running the loop once, otherwise the script is going to take over all available cycles in OBS. The rest of the code is just pre-canned messages for time tracking purposes based on current time and previous state.
|
|
I generally, keep the bot initialized to None at start and after unloading the plugin, but destruction is not guaranteed in the latter case because of Garbage Collection.
|
|
The source activation handler just passes the source to the bot.
|
|
OBS requires that certain functions to be defined to properly maintain the lifetime of objects managed by the plugin. First, script_description just returns the description that is shown in the Scripts dialog.
|
|
script_update is called after initializing the script or after a setting changes. Generally, I make sure that things do not break by unloading the script if the bot was already initialized. It then logins to the server and assigns the “source_activate” handler which is crucial for monitoring what sources are activated in the scene.
|
|
I attached a message to script_load for debug purposes.
|
|
The bot is activated by pressing a button.
|
|
Deactivation is similarly done with a button.
|
|
The actual buttons are part of the bot settings. Luckily, the Discord token which is generated for the bot when you register it is kept in the scene. Once you set it up for a given scene, you do not need any special code to patch config files.
|
|
Unloading is a bit finicky because you need to detach most signal handlers and events before destroying things. Also, you need to disconnect, otherwise it is going to fail badly when you switch scenes. Then you can destroy the main loop and the bot which will clean things up enough, so that the bot re-initializes correctly when you select another scene collection.
|
|
Now the final thing that I want to show is how the Scripts dialog looked like with those options visible in the dialog:
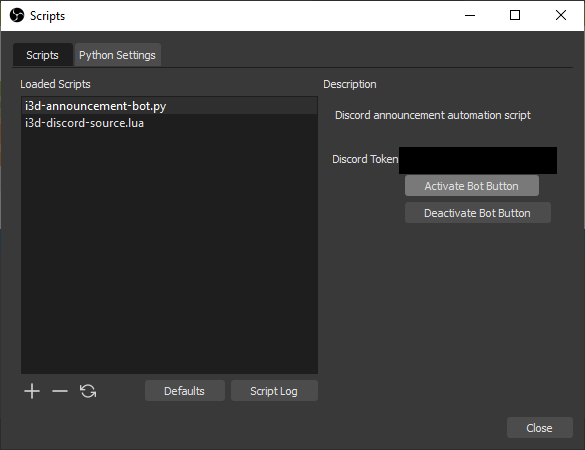
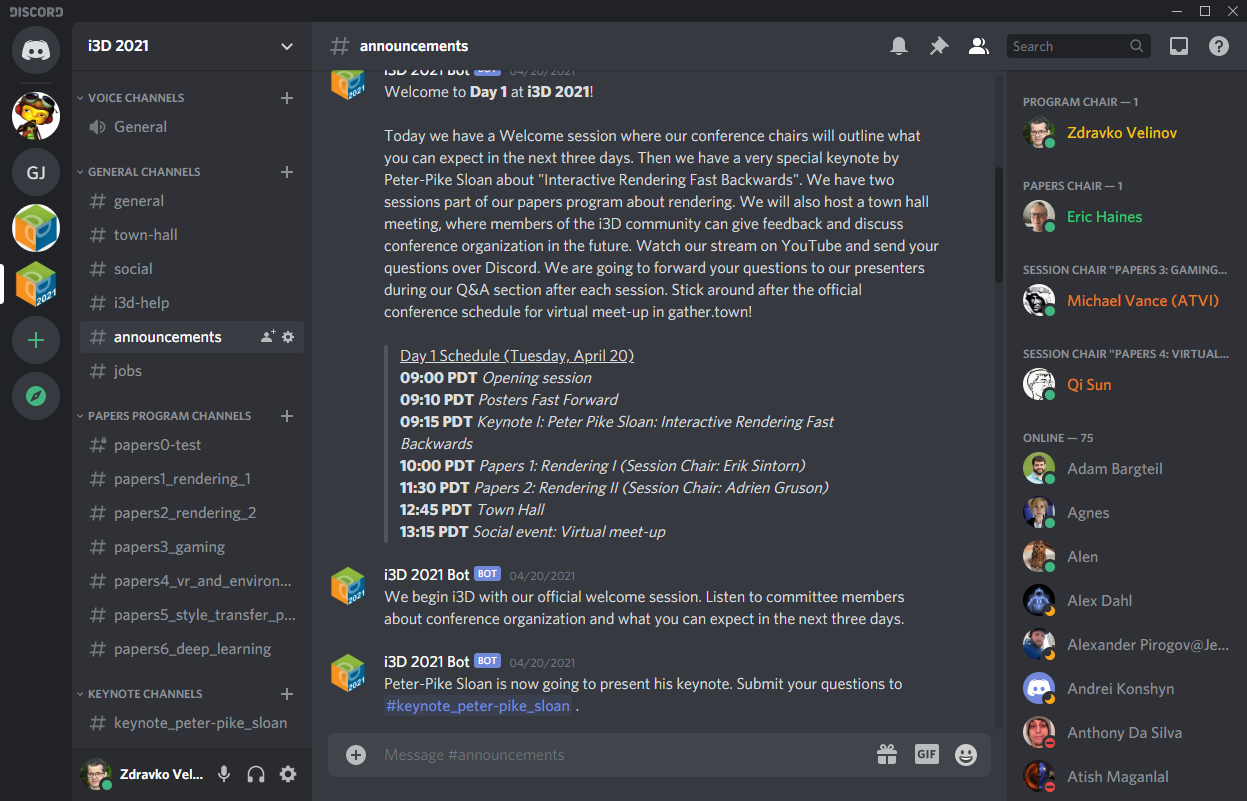
Before each show, I simply clicked the “Activate Bot Button” which resulted in a status update on Discord (#show-status):
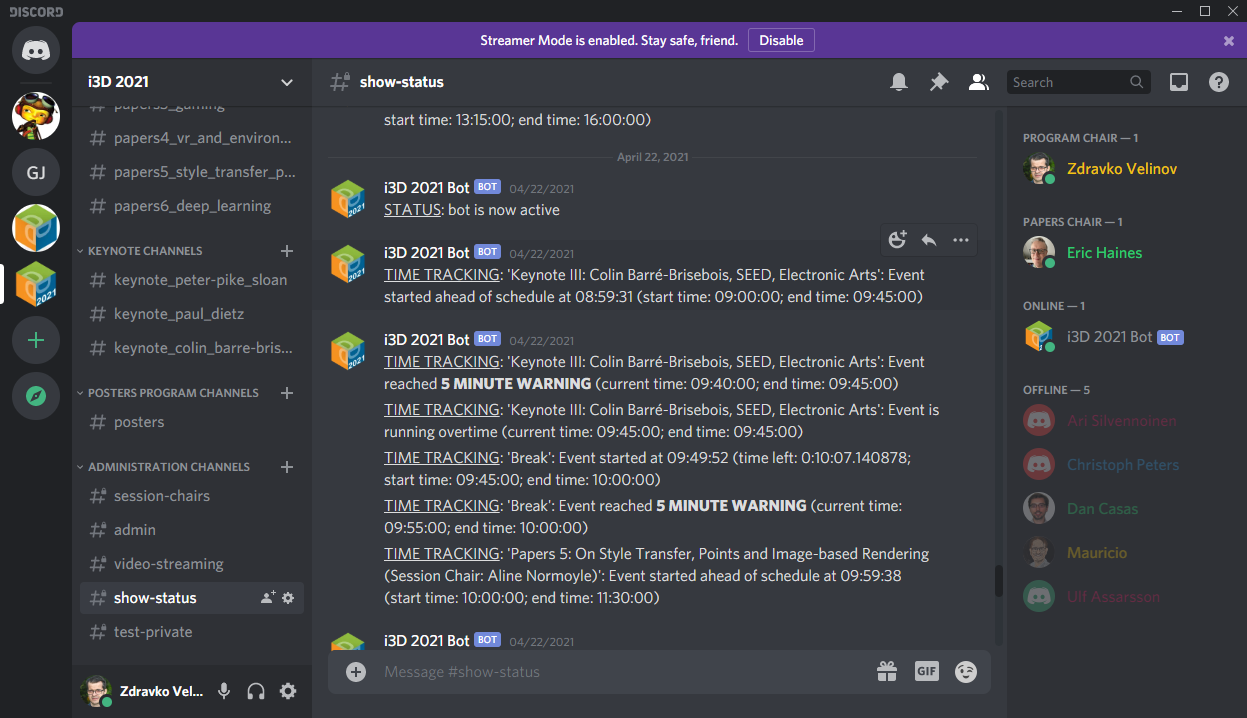
It also did its time tracking on the same channel. Generally, we were pretty consistent at starting on time and we left a few minutes from the break for questions. The only events that did not start on time, did not have any break in between (Posters, Closing ceremony, Social events), so it was pretty much expected. Here is also a sample of the bot doing his announcements:
Surprisingly, I did not have any major issues with that feature as long as it can perform the initial login to Discord. Maybe it will be worth to transfer it to another thread or process to avoid any possible stalling, but it was enough for my application.
Embedding paper information in Discord messages
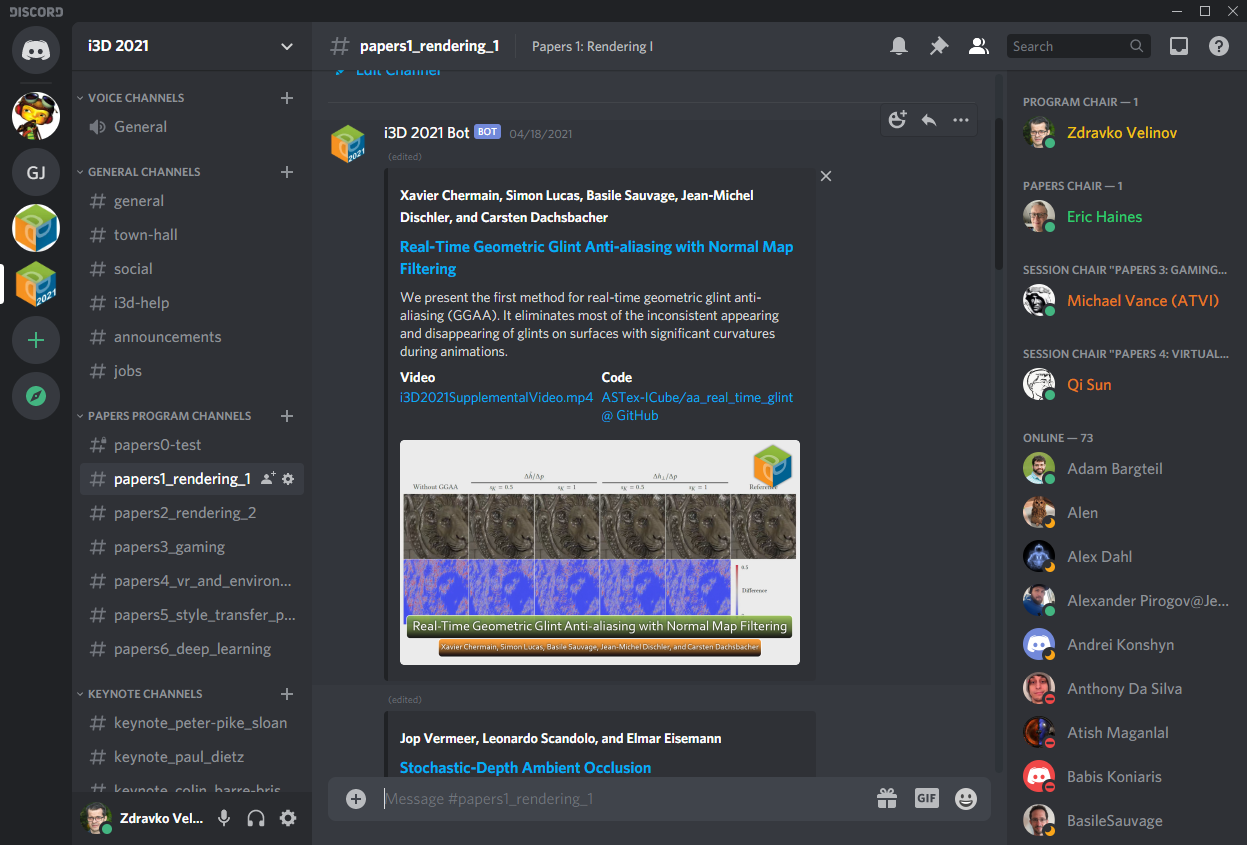
Last year, Sheldon Andrews pinned links to papers in Discord embeds, however I felt that we can improve the look and content of these embeds to convey more information to conference participants. We asked the authors to also submit a Thumbnail (Teaser) and Description of their paper in the Google Form that we used for presentation uploads. Mauricio processed the Thumbnails and added paper names which made them look really nice. A screenshot is shown below:
Automating the task of embedding this information took some extra effort. From what I heard last year, it was done by hard coding the links and authors, but I never saw the code. However, I wanted at least some automatic way of updating them, if necessary. I developed a solution that used a *.json file to specify embeds and it automatically maintained them across channels. Again, it relied on discord.py. Each embed was generating by extracting values from a dictionary assembled by parsing a json file:
|
|
It was quite important to avoid updating Embeds that do not have any changes to avoid things moving around and make the script execute as fast as possible:
|
|
The bot scanned only for messages created by it:
|
|
The class again derived from discord.Client. On construction, it parsed the json file, so that it can start scanning the channels when it is ready. Most of the code attempted to ignore any messages that do not need changing by checking against the current list. If possible, it also avoided creating new messages. Code is below:
|
|
I have added the option to clean up all bot messages in a given channel which was useful for cleaning up test announcements before the conference, but it turned out to be sort of unreliable.
|
|
Finally, the bot requires a token generated by Discord for authentication which in this case is passed with a *.json file.
|
|
It was pretty easy to specify embeds for each channel. Here is a snippet embeds.json:
{
    "keynote_peter-pike_sloan":
    {
        "title": "Keynote: Peter-Pike Sloan",
        "entries":
        [
            {
                "title": "Interactive Rendering Fast Backwards",
                "author": "Peter-Pike Sloan, Activision Publishing, Inc.",
                "url": "http://i3dsymposium.github.io/2021/keynotes.html",
                "image": "http://i3dsymposium.github.io/2021/img/sloan_headshot.jpg",
                "fields": [
                    { "name": "Abstract", "inline": false, "value": "Interactive rendering has changed massively over the last 30 years. In that time I have worked at Evans and Sutherland, a PC game startup using software texture mapping in the early 90’s, shipped a commercial 3D painting program that only ran on SGI Reality engines, worked in the DirectX team at Microsoft and spent the last decade working in the game industry. While there have been many improvements over that time, there have also been some missteps along the way. In this talk I will discuss my experiences as a practitioner, fact check invited talks / panels I have been involved with and see where my past self would have totally been wrong about what things would be like by 2021." }
                ]
            }
        ]
    },
    "keynote_paul_dietz":
    {
        "title": "Keynote: Paul Dietz",
        "entries":
        [
            {
                "title": "Shape Sensing and the Future of Shape",
                "author": "Paul Dietz, Tactual Labs Co.",
                "url": "http://i3dsymposium.github.io/2021/keynotes.html",
                "image": "http://i3dsymposium.github.io/2021/img/Paul_Dietz.jpg",
                "fields": [
                    { "name": "Abstract", "inline": false, "value": "While we have made amazing advances in our ability to design, simulate, and even physically build almost anything we can imagine, measuring the precise shape of real-world objects is still surprisingly hard. Typically, we employ systems that view the objects from a distance such as depth cameras and laser scanners. But these solutions are expensive, suffer from occlusions, and result in large, complex setups. ShArc is a new technique for creating low-cost, strip shape sensors that can be placed on, or embedded in objects to monitor shape in real-time. These sensors will allow us to understand human motion with precision, create highly expressive interfaces, monitor the integrity of physical structures, and provide feedback for compliant actuators. Science fiction has long imagined matter that can be programmed to take any dynamic shape. Precision shape sensing is the first step in achieving this capability." }
                ]
            }
        ]
    }
}
At the top of the tree are the channel names. Inside their struct is the array of entries, which are again structs and include fields with pre-determined properties. “title” and “author” are the only mandatory fields. In fact, editing was so easy that we did #posters a few hours before the conference and it did not take more than 10 minutes to edit the JSON file.
Emailing personalized instructions
Papers and posters chairs relied on EasyChair to send mails, however, we as Program Chairs relied only on a list of emails. We had 3 keynotes and 23 papers. I did most personalized emails for keynotes myself, but for papers, I wanted something slightly less mistake-prone. We already had an Excel Sheet with all papers and their authors. What was needed was something that spliced the right information and sent it to the right authors. It turns out that if you enable temporary “Less Secure Applications” in your Google Account, you can actually submit mails with a script from your account, so that is what I did. Snippet is below.
import csv
import os
from io import StringIO
import io
from smtplib import SMTP
from getpass import getpass
from email.mime.text import MIMEText
import time

cwd = os.path.dirname(os.path.realpath(__file__))

CONFERENCE_CHAIR_NAME = "Test Test"
CONFERENCE_CHAIR_EMAIL_NAME = "test@gmail.com"
CONFERENCE_CHAIR_EMAIL = "%s <%s>" % (CONFERENCE_CHAIR_NAME, CONFERENCE_CHAIR_EMAIL_NAME)
password = getpass()

ref_email_content = \
'''
Dear Paper author,

The i3D committee invites you to present your work "[*PAPER*]".  Your presentation is going to be streamed live on YouTube at [*SLOT*] as part of session titled "[*SESSION*]". Please arrive at least 10 minutes before the session....

When you login to Zoom, make sure that you use your real name. i3D session moderators are going to check your name against a list and then admit you in the Zoom meeting. Then, the video production team is going to check your microphone and camera. After a short 10 second countdown, you will go live on YouTube. Your session chair, [*CHAIR*] ...
'''

session_names = \
[
    { 'name': 'Papers 1: Rendering I', 'chair': 'Erik Sintorn', 'slot': '10:15 on Tuesday, April 20' },
    { 'name': 'Papers 2: Rendering II', 'chair': "Adrien Gruson", 'slot': '11:30 on Tuesday, April 20' },
    { 'name': 'Papers 3: Gaming', 'chair': 'Michael Vance', 'slot': '10:00 on Wednesday, April 21' },
    { 'name': 'Papers 4: Virtual Reality and Environments', 'chair': 'Qi Sun', 'slot': '11:15 on Wednesday, April 21' },
    { 'name': 'Papers 5: On Style Transfer, Points and Image-based Rendering', 'chair': 'Aline Normoyle', 'slot': '10:00 on Thursday, April 22' },
    { 'name': 'Papers 6: Deep Learning', 'chair': 'Daniel Holden', 'slot': '11:45 on Thursday, April 22' }
]

with io.open("%s%sauthors.csv" % (cwd, os.path.sep), mode="r", encoding="utf-8") as csvfile:
    rows = csv.reader(csvfile, delimiter=',', quoting=csv.QUOTE_MINIMAL)
    paper_idx = 0
    for row_idx, row in enumerate(rows):
        if row_idx < 5:
            continue

        main_email = row[3]

        more_emails = csv.reader(StringIO(row[5]), delimiter=';', skipinitialspace=True)
        try:
            email_list = [str(x) for x in next(more_emails)]
        except StopIteration:
            email_list = []
        email_list = [ main_email ] + email_list


        print("%d %s | To: %s" % (paper_idx, row[0], ", ".join(email_list)))


        session = SMTP('smtp.gmail.com', 587)
        session.ehlo()
        session.starttls()
        session.login(CONFERENCE_CHAIR_EMAIL_NAME, password)

        session_info = session_names[int(row[1])-1]

        email_content = ref_email_content
        email_content = email_content.replace('[*SESSION*]', session_info['name'])
        email_content = email_content.replace('[*CHAIR*]', session_info['chair'])
        email_content = email_content.replace('[*SLOT*]', session_info['slot'])
        email_content = email_content.replace('[*PAPER*]', row[0])

        #uncomment to test first with your email
        #email_list = [ "test@test.com", CONFERENCE_CHAIR_EMAIL ]

        message = MIMEText(email_content)
        message['to'] = ",".join(email_list)
        message['from'] = CONFERENCE_CHAIR_EMAIL
        message['subject'] = "Presenter instruction"

        text = message.as_string()
        session.sendmail(CONFERENCE_CHAIR_EMAIL, email_list, text)

        time.sleep(10)

        paper_idx += 1
It goes without saying that you have to be very careful with using those systems to avoid sending test mails by accident. I also have a Discord bot for emailing invites lying around. If someone is interested, I can discuss it in a separate post. We did not end up using it because it was deemed too complex (114 lines of code…) and instead we relied only on the Google Form to provide invites…
Conclusion
I hope that you enjoyed hearing about what sort of software solutions I crafted to make i3D 2021 possible, and that you enjoyed the show. I might have omitted certain details to keep this post slightly more on point and covering the more important aspects. Organizing virtual conferences is certainly a very complex task and I made some tools to make my life slightly easier and provide at least some way to replicate my setup across systems.
Zdravko Velinov
Graphics Research Person
My research interests cover physically based rendering and digital material acquisition and modeling.